开源邮件系统 RainLoop Webmail 部署教程| WSL 环境
背景
如果我们想搭建个人邮箱服务器,推荐使用 RainLoop Webmail。据官网介绍,这是一款简单、现代且快速的基于 Web 的电子邮件客户端。RainLoop 提供了全套的前后端服务,是一个完整的邮箱软件。
部署
由于 RainLoop 是 PHP 写的程序,需要 Apache 来启动邮箱服务,有两个方式部署 Apache,一是直接安装 Apache 单机服务,二是用 Docker 安装 Apache 服务。这里我们在本地使用单机安装的方式启动,然后到服务器上采用 Docker 的方式启动,学习下这两种安装方式。
本地部署
部署到服务器之前,我们先在本地 WSL 环境搭建试验下。
安装依赖
apt-get update
sudo apt-get install apache2
sudo apt-get install php
apt-cache search libapache2-mod-php
sudo apt-get install libapache2-mod-php
apt-get install php-curl
apt-get install php-xml
下载 rainloop 安装包
mkdir /var/www/html/rainloop
unzip rainloop-latest.zip -d /var/www/html/rainloop

cd /var/www/html/rainloop
find . -type d -exec chmod 755 {} \;
find . -type f -exec chmod 644 {} \;
# • Set owner for the application recursively:

cd /var/www/html/rainloop
chown -R www-data:www-data .
启动服务
启动 apache 服务
sudo /etc/init.d/apache2 start重启 apache 服务
sudo /etc/init.d/apache2 restart停止 apache 服务
sudo /etc/init.d/apache2 stop检查 apache 服务状态
sudo /etc/init.d/apache2 status更新配置
文件位置
\\wsl$\Ubuntu\var\www\html\rainloop\data\_data_\_default_\configs开启联系人[contacts] ; Enable contacts enable = On测试 访问:
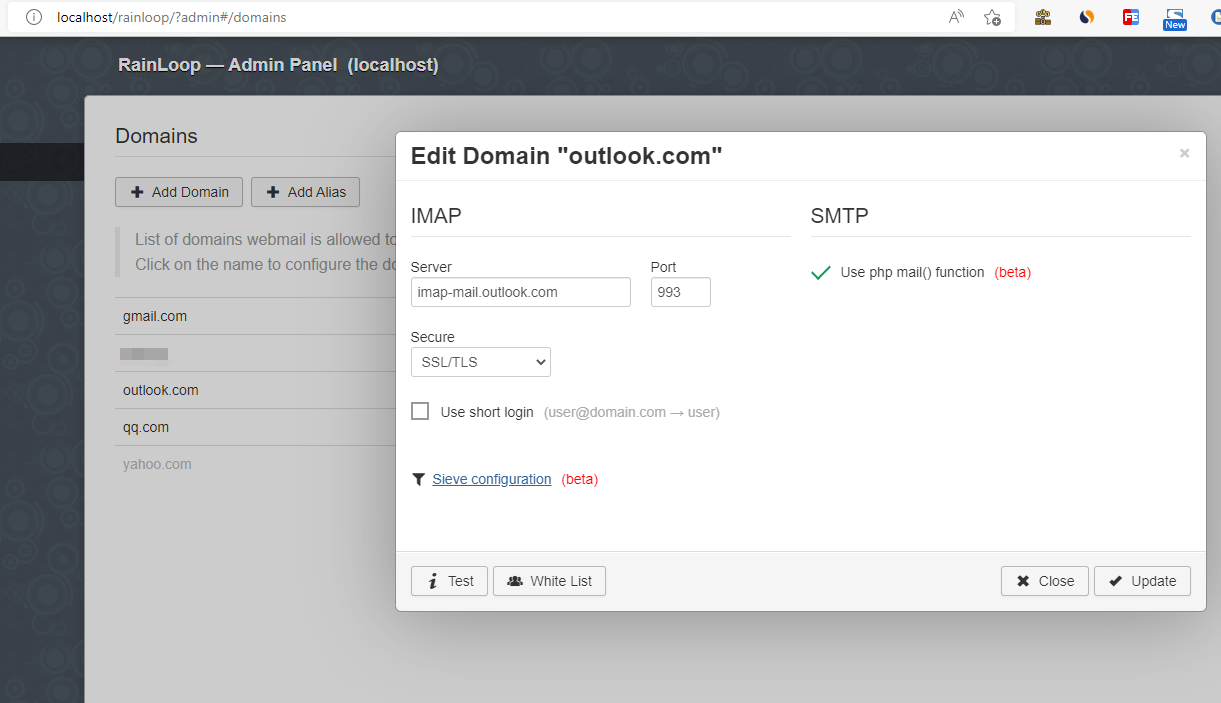
http://localhost/rainloop/?adminadmin/12345配置邮件服务器
配置 outlook
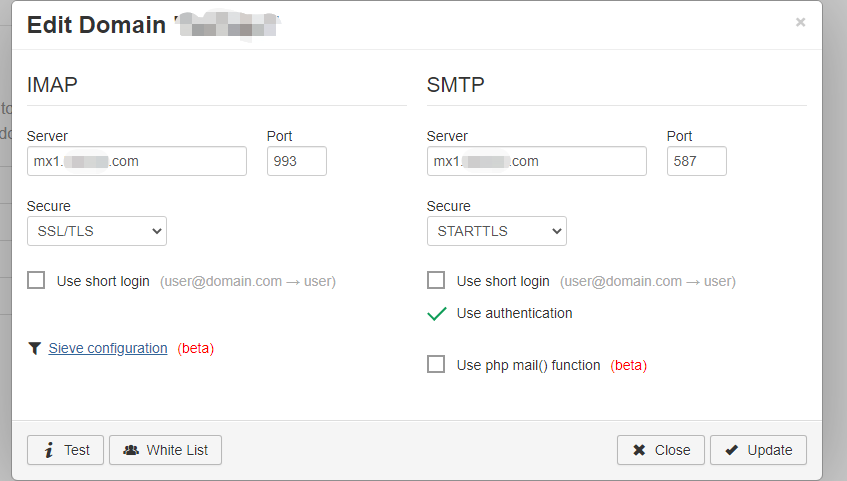
或者配置自建服务器 mx1.yourdomain.com
6) 登陆
打开 `http://localhost/rainloop/`,使用 outlook 邮箱登陆,或者自建邮箱登陆 `youremail@yourdomain.com / youremailpwd`服务器部署
安装 rainloop
下载地址:https://www.rainloop.net/try-now/
传到服务器上的目录,比如
/software/email/rainloopmkdir rainloop && cd rainloop unzip rainloop-latest.zip -d rainloop chmod -R 777 rainloop/software/email/rainloop目录下 新建 rainloop 的 nginx 配置rainloop.conf
server { listen 80; listen [::]:80; server_name rainloop; location / { root /usr/share/nginx/html; index index.php; } location ~ \.php$ { root /var/www/html; fastcgi_pass php:9000; fastcgi_index index.php; fastcgi_param SCRIPT_FILENAME $document_root$fastcgi_script_name; include fastcgi_params; } location ^~ /data { deny all; } }/software/email/rainloop目录下 新建docker-compose.ymlversion: '3.8' services: php: image: php:8.1.6RC1-fpm-alpine3.15 container_name: php restart: on-failure volumes: - ./rainloop:/var/www/html logging: driver: json-file options: max-size: "1m" max-file: "10" nginx: image: nginx:alpine container_name: nginx restart: on-failure volumes: - ./rainloop:/usr/share/nginx/html - ./rainloop.conf:/etc/nginx/conf.d/default.conf ports: - 8446:80 logging: driver: json-file options: max-size: "1m" max-file: "10"启动
/software/email/rainloop目录下执行docker-compose up -d打开
http://主机ip:8446即可访问
其他 CentOS 命令
sudo yum install php-clisudo yum install php-xmlsudo chmod -R 777 ./ && sudo chown -R opensource:opensource ./
总结
以上就是我对使用 RainLoop 自建邮箱服务的一点经验,您可以根据自己的需求,在本地搭建邮箱系统,或者直接在服务器上部署一套完整的邮件收发服务。有不足之处欢迎评论。
评论