Open Source Mail System RainLoop Webmail Deployment Tutorial|WSL Environment
Introduction
If we want to build a personal email server, RainLoop Webmail is recommended. According to the official website, this is a simple, modern and fast web-based email client. RainLoop provides a full set of front-end and back-end services and is a complete email software.
Deployment
Since RainLoop is a program written in PHP, Apache is required to start the mailbox service. There are two ways to deploy Apache, one is to install Apache stand-alone service directly, and the other is to install Apache service with Docker. Here we use the stand-alone installation method to start locally, and then use the Docker method to start on the server, and learn these two installation methods.
Local deployment
Before deploying to the server, we first set up an experiment in the local WSL environment.
Install dependencies
apt-get update
sudo apt-get install apache2
sudo apt-get install php
apt-cache search libapache2-mod-php
sudo apt-get install libapache2-mod-php
apt-get install php-curl
apt-get install php-xml
Download the rainloop installation package
mkdir /var/www/html/rainloop
unzip rainloop-latest.zip -d /var/www/html/rainloop

cd /var/www/html/rainloop
find . -type d -exec chmod 755 {} \;
find . -type f -exec chmod 644 {} \;
# • Set owner for the application recursively:

cd /var/www/html/rainloop
chown -R www-data:www-data .
Start the service
Start the apache service
sudo /etc/init.d/apache2 startRestart the apache service
sudo /etc/init.d/apache2 restartstop the apache service
sudo /etc/init.d/apache2 stopCheck apache service status
sudo /etc/init.d/apache2 statusUpdate configuration
File location
\\wsl$\Ubuntu\var\www\html\rainloop\data\_data_\_default_\configsopen contacts[contacts] ; Enable contacts enable = OnTest Visit:
http://localhost/rainloop/?adminadmin/12345Configure mail server
configure outlook
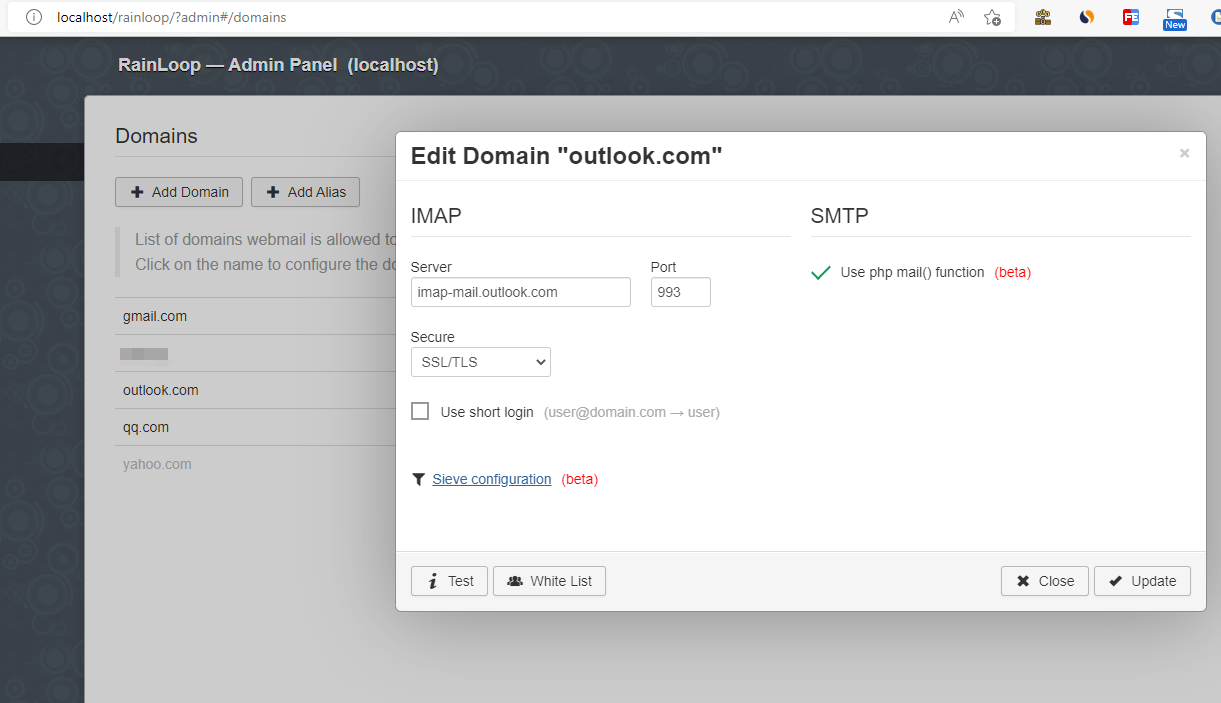
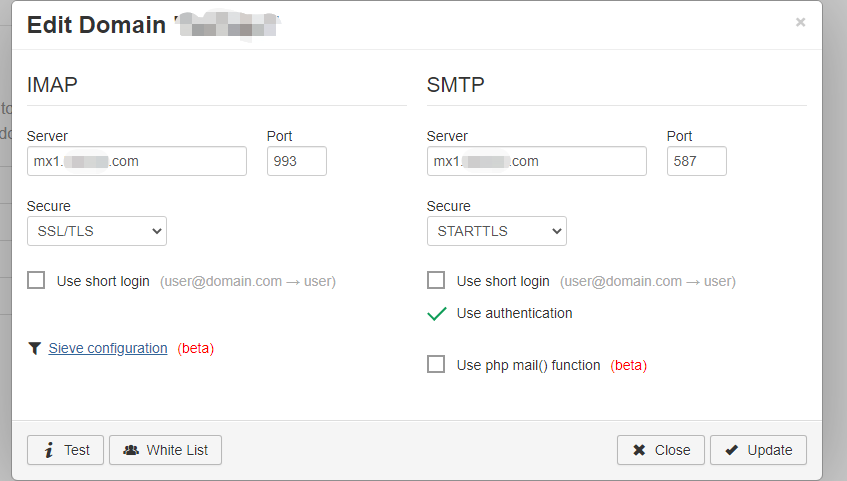
Or configure a self-built server mx1.yourdomain.com
6) Login
Open `http://localhost/rainloop/`, log in with your outlook mailbox, or log in with your own mailbox at `youremail@yourdomain.com / youremailpwd`Server Deployment
Install rainloop
Download link: https://www.rainloop.net/try-now/
Pass to a directory on the server, such as
/software/email/rainloopmkdir rainloop && cd rainloop unzip rainloop-latest.zip -d rainloop chmod -R 777 rainloopCreate the nginx configuration of rainloop under
/software/email/rainloopdirectoryrainloop.conf
server {
    listen 80;
    listen [::]:80;
    server_name rainloop;

    location / {
        root /usr/share/nginx/html;
        index index.php;
    }

    location ~ \.php$ {
        root /var/www/html;
        fastcgi_pass php:9000;
        fastcgi_index index.php;
        fastcgi_param SCRIPT_FILENAME $document_root $fastcgi_script_name;
        include fastcgi_params;
    }

    location ^~ /data {
    deny all;
    }
}
Create a new
docker-compose.ymlunder the/software/email/rainloopdirectoryversion: '3.8' services: php: image: php:8.1.6RC1-fpm-alpine3.15 container_name: php restart: on-failure volumes: - ./rainloop:/var/www/html record: driver: json-file options: max-size: "1m" max-file: "10" nginx: image: nginx:alpine container_name: nginx restart: on-failure volumes: - ./rainloop:/usr/share/nginx/html - ./rainloop.conf:/etc/nginx/conf.d/default.conf ports: - 8446:80 record: driver: json-file options: max-size: "1m" max-file: "10"start
Execute under
/software/email/rainloopdirectorydocker-compose up -dOpen
http://host ip:8446to access
Other CentOS commands
sudo yum install php-clisudo yum install php-xmlsudo chmod -R 777 ./ && sudo chown -R opensource:opensource ./
Conclusion
The above is my experience of using RainLoop’s self-built email service. You can build an email system locally or deploy a complete set of email sending and receiving services directly on the server according to your needs. Comments are welcome.
Comments